
A few weeks ago we enabled Java Web Start in our E-Business Suite environment. Shortly after, we heard from our users there was a small issue. The fonts in the forms were small and not as smooth looking at before. After doing some research I found a My Oracle Support document that covered this.
Implementation Options
The document Oracle provided gives us two solutions. Let’s review these both.
Option 1
The first option is to add a parameter to the Java console runtime parameters. The steps are as follows:
- Open the Java console, then navigate to the Java tab, and click on View.
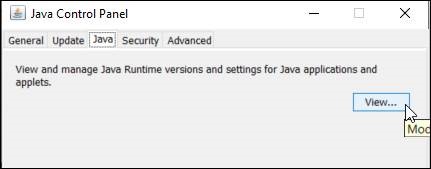
- In the Runtime Parameters box enter, -Dsun.java2d.dpiaware=true then click on Okay
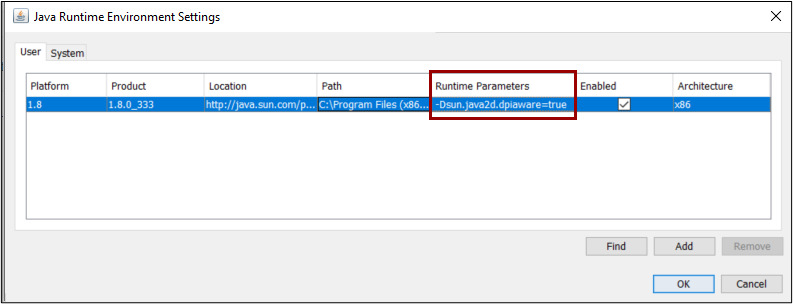
- Click on Apply and then OK.
- Open the Edge browser and launch Oracle.
There is a downside to this option. First, it has to be done on each client machine. Second, when a new version of Java is installed, the parameter needs to be re-added. It’s possible that your company might be able to control this with GPO rules. Unfortunately, that still won’t help if you have outside contractors working at your company. They will still need to add it manually since GPO rules don’t apply to them. I prefer the server option we are going to look at next. This ensures that anyone that opens a form will receive the setting.
Option 2
The second option is to customize an autoconfig template that Oracle provides for us. The name of this file is forms_jnlp.tmp. The file is located in $FND_TOP/admin/template. You’ll need to follow the Oracle documentation on the proper way to custom an autoconfig template. Oracle E-Business Suite Setup Guide
Procedures
Create a directory named custom at the location where the AutoConfig template file is located.
$ mkdir -p $FND_TOP/admin/template/custom
Copy the AutoConfig template File to the custom directory
$ cp -i $FND_TOP/admin/template/forms_jnlp.tmp $FND_TOP/admin/template/custom/forms_jnlp.tmp
Edit the file with your favorite text editor. I used vi. Add the following line:
<property name=”sun.java2d.dpiaware” value=”true”/>
$ vi $FND_TOP/admin/template/custom/forms_jnlp.tmp

<!-- Application Resources -->
 <property name="jnlp.secure.parameter.*" value="true" />
 <property name="jnlp.sis.session" value="%jnlp_sis_session_id%"/>
 <property name="jnlp.delete.jnlp.file" value="true"/>
 <property name="sun.java2d.dpiaware" value="true"/>
Verify the template customizations by executing the adchkcfg utility.
$ adchkcfg.sh
Enter the full path to the Applications Context file:
/u01/app/applmgr/MYEBS/fs1/inst/apps/MYEBS_myebssvr01/appl/admin/MYEBS_myebssvr01.xml
Enter the APPS password:
Next, we can look at the differences report. This will show us what is going to change when we run AutoConfig.
Driver: /u01/app/applmgr/MYEBS/fs2/EBSapps/appl/ad/12.0.0/admin/driver/adtmpl.drv

  Configuration File Changes
  ==========================

  [CHANGED]
    Existing file: /u01/app/applmgr/MYEBS/fs1/inst/apps/MYEBS_myebssvr01/ora/10.1.2/forms/server/ebiz.jnlp
    New file:
/u01/app/applmgr/MYEBS/fs1/inst/apps/MYEBS_myebssvr01/admin/out/06071804/ebiz.jnlp
    Diff file:
/u01/app/applmgr/MYEBS/fs1/inst/apps/MYEBS_myebssvr01/admin/out/06071804/x_ebiz.jnlp

  TEMPLATE CUSTOMIZATIONS
  =======================

    Template: /u01/app/applmgr/MYEBS/fs1/inst/apps/MYEBS_myebssvr01/appl/fnd/12.0.0/admin/template/forms_jnlp.tmp
    Custom Template: /u01/app/applmgr/MYEBS/fs1/EBSapps/appl/fnd/12.0.0/admin/template/custom/forms_jnlp.tmp
    Diff File: /u01/app/applmgr/MYEBS/fs1/inst/apps/MYEBS_myebssvr01/admin/out/06071804/xt_forms_jnlp.tmp
At last we can run AutoConfig.
$ adautocfg.sh
Note: The steps with creating the directory, copying the template file, and modifying the template, must be done on the patch file system too.
Template Customization Validation
Next, let’s do a validation to confirm that our clients are receiving the new parameter in the form.
In the Java console, let’s enable the show console option.
Windows Key > Configure Java > Advanced Tab
Check the Show console option. Then click Apply and Ok.
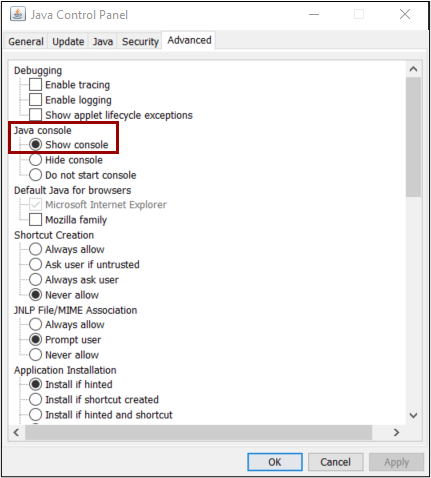
Open a new Edge browser, login to Oracle, then launch a form.
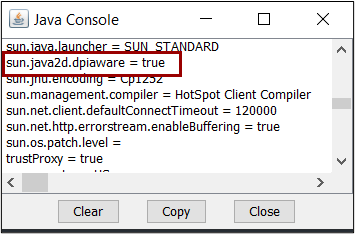
You’ll have a Java console box pop up. Click on it and then type the letter s for dump system and deployment properties.
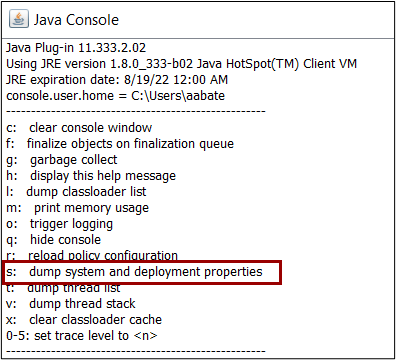
All the system properties will be dumped to the screen. In the list you’ll find the newly set parameter.
Conclusion
In summary, after we implemented these steps, our users confirmed the issue was resolved. Although Oracle support provided the solution, it only provided a general outline. I hope this post gives you more complete steps with visuals to perform this fix.
Related Posts
 JAR resources in JNLP file are not signed by same certificate
- Oracle EBS Output Post Processor (OPP) – Queue Rebuild
- Oracle E-Business Suite eTRM
- Internet Explorer 11 End of Life – Impact to Oracle E-Business Suite
- Oracle EBS XML Publisher Templates- Ancestor-or-Self Tags
- Oracle E-Business Suite 12.2 – Symbolic Links